Monday, May 28, 2012

Step 2 Memorial Day

Hey Guys this weekend was crazy with all the festivities. I went down the river a couple times this weekend and to say my nails took a beating is an understatement. But I do have pictures of my watermarble Red, White and Blue. I loved how they came out it and I rocked them down the river and at the BBQ.

Finished Left Hand                                                              Finished Right Hand


My hand after I finished dipping and before I took off the tape. Looks a little messy. :D

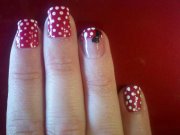
My Hands without glitter.
Here are the polished I used. 
O.P.I. Servin' up Sparkle, O.P.I. Love is a Racket, Sally Hansen White On, 
Sinful Collection Aquamarine

Hope you enjoyed looking at my process and I was happy with the out come. I hope everyone had a safe and enjoyable Memorial Day weekend and Until Next Time.......

Francesca

Thursday, May 24, 2012

Step 1 of Memorial Day Nails

Good Evening guys,

 I'm sorry I haven't posted in awhile, been a little under the weather and just couldn't bring myself to write a post. However I painted my nails with this awesome blue from Sinful Collections.

I was looking for a color that would look great with the watermarble I want to try for the Memorial Day weekend. If you can't guess the colors its going to be Red, White and Blue. I'll be doing this tomorrow and share with you guys my step by step procedure. I love supporting the holidays and showing it with my nails. Until next time.....

Francesca

Monday, May 21, 2012

Happy Monday

Good Evening,

Well today was another gloomy day with all this rain but I got to try out one of my new polishes. I had just recently bought China Glaze Awakening. Its a pretty color it looks purple at first look with a hint of gold, but once painted on the nail it reminds me of a Rose Quartz.
I painted two stars on my ring finger of each hand and used O.P.I. Servin' up Sparkle to top it off. I'm right handed so the design on my right hand is a little shaky.
I love this color in the light it seems to change. Its an everyday color that seems to go with almost everything. Until next time.....

Francesca

Sunday, May 20, 2012

RED WHITE & BLUE

Good Evening everyone,

 Happy Sunday sorry I didn't get a chance to post yesterday. Well I rarely give myself a pedicure but with the upcoming holiday I felt I needed to change up my polish. So gone went the pretty purple toes I had and here are the Red, White, and Blue sparkly toes for Memorial Day.


I painted my toe nails with Sally Hansen White On and let them dry. Once they were dry I took a piece of scotch tape and placed it diagonally across my nail and painted the corner with O.P.I. Love is a Racket and had that dry before placing another piece of tape across the red leaving a small line of red showing and painted the remaining nail with Pure Ice French Kiss. I then topped it off with O.P.I Servin' up Sparkle and Rapid Dry Top Coat.


As always I posted a picture of the polishes I used for this pedi. Until next time.....


Francesca


Friday, May 18, 2012

Watermarble Take 2

Good Evening Everyone,

Well I believe my second attempt was a better success. I feel it may have been the colors I chose this time since they are a lot brighter compared to the orange and black I chose last time.
 The first attempt was my ring finger, I only put a base coat on and used O.P.I.'s No room for the blues and La Paz-itively Hot and Sally Hansen No Hard Feelings.
 I then wanted to see how a french tip would look with the watermarble and painted my entire nail with Sally Hansen's No Hard Feelings. I taped off my pointer finger and middle finger nail and left the free edge open to dip into the water. I liked how it looked but I wanted to see how it would look with my whole nail done with the purple background. So I decided to do my entire finger nail with my pinky and thumb.
O.P.I. La Paz-itively Hot, Sally Hansen's No Hard Feelings, and O.P.I.  No room for the Blues
All an all this was one big experiment but I love the out come.
until next time...

♥ Francesca


Thursday, May 17, 2012

Watermarble attempt

Good Afternoon Everyone,

 Well I've always wanted to try this but from watching other tutorials on how to do a watermarble manicure I've heard the first attempt isn't always the greatest, and that practice makes perfect. So I attempted and even though I love one nail the others are ehhh ok. But I wanted to share my attempt and hopefully next time its a greater success.

 
I taped my nails with scotch tape to help with the clean up because that is the one step in painting my nails that I hate.


Here is the finished results and yes as you can see I still have some clean up around the nails to do.
 
This pic here is my favorite nail and I have it with my inspiration for the choice of colors I chose.

Here are the polishes I chose for my watermarble. I based all my nails with the Pure Ice Electric polish and created the watermarble affect with Rimmel Londons Black Satin and O.P.I.'s Cajun Shrimp

Well until next time... Thanks for reading!

  ♥ Francesca


Wednesday, May 16, 2012

Galaxy Nails

Good Evening Everyone,

   Well I've seen so many different types of galaxy nails and watched so many tutorials on how to do them. I just had to try them. So here they are.


I found this to be a lot of fun and there really isn't a wrong way for doing this.  I started with painting all nails with the Pure Ice Electric, then I took a makeup sponge and cut off the corner and sponged a diagonal line with Sally Hansen Hard as Nails  White On, then I layered with N.Y.C. Taxi Yellow Creme,  N.Y.C Fuchsia Shock Creme, and Ulta Blue Streak. Then I topped it off with O.P.I.  Servin' up Sparkle and Rapid Dry Top Coat
  

Here is all the polishes I used for this mani.  Until next time....
Thanks for reading.

♥ Francesca


Tuesday, May 15, 2012

Got the Blues


Good Evening Everyone,

All this rain we've been having by me has made me blue, so I chose to paint my nails...
Fashionablenailsonthego
OPI No Room For The Blues
When I am looking at nail polish to buy I don't always buy by collection but by the colors that stand out for the season I'm in. I love this color not only because its a nice shade of blue but because its not a dark dreary shade of blue. This polish is from O.P.I.'s Brights Collections and is perfect for the spring/summer seasons.

But to change up the simple BLUES polish by adding some glitter to the nails makes all the difference to help them shine. I used Sally Hansen Ice Queen which went perfect with the blue polish. I used a Rapid Dry Top Coat to top off the nails. I added a pic below of all four polishes I used on my nails.
Until next time......

Francesca

Fashionablenailsonthego

MINNI MOUSE NAILS!!!!


Good Afternoon Everyone,


I love Disney and Mickey and Minni are definitely two characters I think of. The nail polish I used to do this is OPI Red, and OPI nail Envy. I painted all but my ring finger OPI Red and just put a base coat on the ring finger.  Red isn't my favorite color to use but for these it seemed the best color to use. I used a dotting tool to make the white poka dots and the black bow. Two ways to create the ring finger is: if your good with painting straight lines on your nails than just eye ball the red paint across or if your not use scotch tape and place that on your nails a little down from your free edge and then paint the red across. Let the polish dry a little before removing the tape. Once the red polish is dry then create your white poka dots on the nail. There really isn't a technique for placing dots on the nail but I try to evenly space them out and not have them clump together. I used acrylic paint for both the white poka dots and black bow. I find its faster to dry then nail polish. On the ring finger once I finished with the white poka dots I create the bow on an angle toward the right side of the nail on my right hand and towards the left on my left hand. I simply placed a small black dot on the red line and make two small triangles on either side of the dot to create a bow. Once that's dry I put a top coat on and its complete. Very simple, very cute nail design. I hope you try this and share with me your ideas on how to change it up a little. Until next time...

♥ Francesca


Monday, May 14, 2012

First Blog Ever

Good Evening everyone,
Well I've been going back and forth on whether I wanted to start a blog on nails, but finally broke down and decided its somewhere I can channel all my ideas and share them with everyone. Starting tomorrow I will be posting pics of some of my nails that I've done and give some instructions on how to do them, to help anyone out that wants to try it. Any feedback is welcomed. Hopefully I'll get the hang of all this. Until my next post......

Francesca